When NAT Bites — Use a Reverse VPN
Updated Friday, Jul 12, 2024
Sometimes I find myself setting up servers on networks with less than ideal network configuration. Most home internets use dynamic IP addresses, which requires extra work to ensure I know the IP address to use when logging into the network from the internet. Another concern is how unreliable home networking gear can be, especially with users tweaking settings without fully appreciating what they’re doing. As a result, I’ve devised an alternate solution to ensure I can always log into boxes hosted on home internet connections.
§How to ssh into a home server box — the standard way
Let’s say I am to set up a box on a home network. I want to ensure I can log in via SSH from the outside world — that is anywhere online. In IPv6 and IPv4 land it is equally painful and possibly unreliable.
§Allowing ssh logins oven IPv6
After setting up the box on the network, I will need to configure the router’s firewall to allow SSH traffic on through. In the case of IPv6 this is as simple as telling the router to allow traffic inbound on port 22 to my box’s IPv6 address, which is globally routable and unique to my box. One more thing: the ISP gives each IPv6-enabled subscriber a IPv6 prefix, which is a bunch of IPv6 addresses that the customer’s equipment utilize via SLAAC. Let’s work through an example:
-
The ISP gives your router IPv6 prefix
2001:db8:a:b::/641 via DHCPv6 -
Every device on the network assigns itself an IPv6 address via SLAAC
-
Each device on the network is globally routed via a unique IPv6 address. For example the server box is
2001:db8:a:b::1, the router is2001:db8:a:b::5:1, and my phone is2001:db8:a:b::c:d. -
I want to log into the server box. I ssh in to the server box’s address directly.
-
The router permits SSH traffic to my server box through its firewall
-
Success! I am logged in.
It seems pretty straight forward, But there is a catch: when your DHCPv6 lease expires (e.g. 1 week), there is a possibility your network is assigned a new IPv6 prefix. Hence the IPv6 address can be thought as dynamic.
In order to get around this limitation, one can use Dynamic DNS and update a AAAA DNS record for every host on the LAN that needs to be accessed via the internet. This means you’ll either have to run a Dynamic DNS client on each host, or use some sort of host discovery to set Dynamic DNS AAAA records on another host’s behalf. Seems a bit confusing; in short when using IPv6 on a home network, special care is needed to ensure SSH is accessible.
§Allowing ssh logins over IPv4
Looking at IPv4, some things differ. As in IPv6’s case, one needs to allow SSH traffic to the target box on the home network. What differs is one does not directly address the internal host; instead one has to address the router (which is usually plugged directly into the modem/internet). The router then passes this SSH traffic to the box on the home network. In effect the router is translating between different network segments. The feature of your router passing traffic on a port to another host on the home network is known as port forwarding.
Now that we understand the main difference, we should also discuss how IPv4 addresses are given to home ISP users. Typically the mechanism of how your home router gets an IPv4 address is the same as how your personal devices get addresses from the router. In both cases the device requesting an address uses DHCP to solicit a IPv4 address and related configuration (such as DNS servers and default gateway). Again the same process is applied to each device on the home network. They simply get IPv4 addresses from the router, but in this case, the router does not give out globally routable addresses, but instead gives out private IPv4 addresses. These private IPv4 addresses are not globally routable, and instead depend on the router to figure out where to send internet stuff. Also, as with DHCPv6, there is a finite lifespan for DHCP leases. As such after awhile, your router’s IPv4 address may change.
Let’s work through a IPv4 example:
-
Your router solicits a IPv4 address from the ISP, such as
203.0.113.1.2 This is the only internet-routable address used in the setup. -
Each device on the network solicits an IPv4 address from the router.3 Each device has its own private IPv4 address.4 In this example the server box has
192.168.1.20, the router has192.168.1.1, my phone has192.168.1.101. -
Internet traffic is directed towards the router (acting as the default gateway), which in turn translates the network traffic. This is done by replacing the private IPv4 address and source port with the public IPv4 address and a “session port”, which is used to uniquely map between traffic belonging on the internet side to traffic belonging on the home network side. This is network address translation.
-
When I want to log into the server box, I ssh into the router’s public IPv4 address.
-
The router translates the ssh traffic to a the private IPv4 address space and sends it off to the server box. The server box then handles the ssh session sent from the router, which then the router relays back and forth between the server box on the private LAN with my internet computer.
Seems a bit convoluted too. But it does work. When combined with Dynamic DNS to update an A DNS record for the router’s public IPv4 address, it can work pretty flawlessly.
§What can go wrong?
When using any of the above approaches to set up SSH login, a few things can go wrong.
-
In both IPv4 and IPv6, the router depends on the ISP to assign internet addresses. As such in both cases, Dynamic DNS or a similar mechanism is needed to ensure I can log in via a DNS record, or at least know what address works when using SSH. If I don’t know the latest internet address, I cannot log in.
-
The router has to be specially configured to allow traffic in both IPv4 and IPv6 situations. Using IPv6, the router must permit traffic to the server box. Using IPv4, the router has modify network traffic it receives on the SSH port and pass it on to the server box. And then it does the same to send traffic back to my internet device. If the router configuration breaks for whatever reason, I cannot log in.
-
Some internet connections cannot receive SSH traffic. Most mobile internet service providers (such as ATE) use Carrier Grade NAT to allow multiple internet subscribers to connect to the internet using the same public IPv4 address. Port forwarding won’t work with Carrier Grade NAT. Additionally some ISPs do nefarious things like blocking ports for you. After all it’s pretty normal for ISPs to block SMTP (even if I think it’s bonkers).
In short the network operator must cooperate with you to make this happen. In some cases the hardware isn’t capable either.
§A few options
Before continuing I’d like to point out—like most technology—the exact same tools every single user uses daily (in one form or fashion) can be used to attack the same systems. As such the next example is for demonstration purposes. Data is sent plain text and no authentication/verification of host or user is performed. Computers networks are only as secure as their users ;).
§Punt the socket using socat
One can use socat to (1) run a socat client that connects to a internet server, which sends all data to the home server box’s SSH port and (2) run a socat server on the internet host which sends traffic it receives to the socat client connected on another port on the internet server.
Let’s try this out: given host public.example.com and your LAN host
not-reachable.lan, run socat TCP-LISTEN:9991,fork,forever TCP-LISTEN:9992
on public.example.com, then run socat TCP-CONNECT:public.example.com:9991,fork,forever TCP-CONNECT:localhost:22 on
not-reachable.lan. Now run ssh -p 9992 public.example.com. You should see
the familiar messages of OpenSSH.
Sounds a bit confusing, because it is. Additionally there is not an easy mechanism to ensure multiple ssh sessions can be used simultaneously, and to ensure the authenticity of the socat client that connects to the internet server. So I wouldn’t use this in production ;). Note: socat can use OpenSSL, which can address the authenticity problem, but I still don’t think this is a very intuitive way to solve the problem.
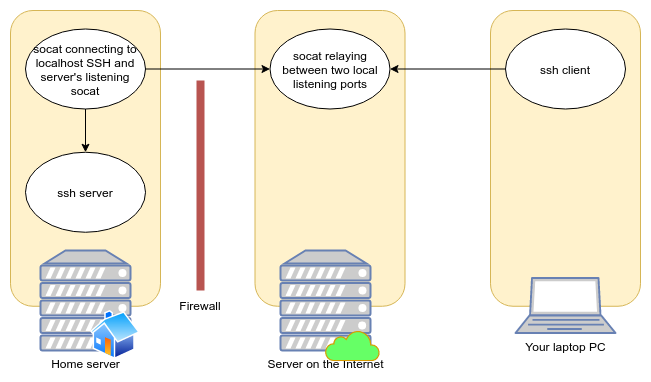
Figure 1: socat topology. Arrows point away from the connecting socket to the destination process.
§Better: Using OpenSSH
During a recent episode of Linux Unplugged, there was discussion of using
OpenSSH to dial in to a internet-reachable host. The secret sauce is to use
the RemoteForward option (ssh -R). This can be achieved like ssh -R 2222:localhost:22 my-server.example. Then from the server, one can run ssh -p 2222 localhost to log into the firewalled host’s SSH server. Alternately,
OpenSSH also supports forwarding a SOCKS5 proxy, which can be used in
conjunction with a web browser to browse web configuration UIs with little
effort, or with use other applications via the tool proxychains.
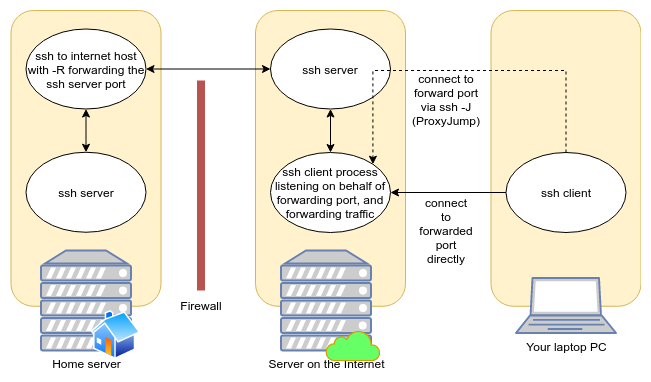
Figure 2: ssh reverse port forwarding topology.
§My Solution: Use OpenVPN
I wanted to allow for the firewalled host be accessible as an unique network address, without need for SOCKS5 or other steps. The solution I came up with is to stand up a OpenVPN server process on the internet host, then run OpenVPN client on the remote host. The configuration is deceptively simple, despite OpenVPN’s featureful footprint.
Some OpenVPN operators allow users to log in via username or password associated with their account, but this appears a bit complicated to set up. Instead, the OpenVPN folks recommend setting up a Self-signed certificate authority to dole out TLS certificates. This is achieved using the very handy script EasyRSA, which streamlines the process of creating a Certificate Authority and issuing keypairs into a handful of very short commands.
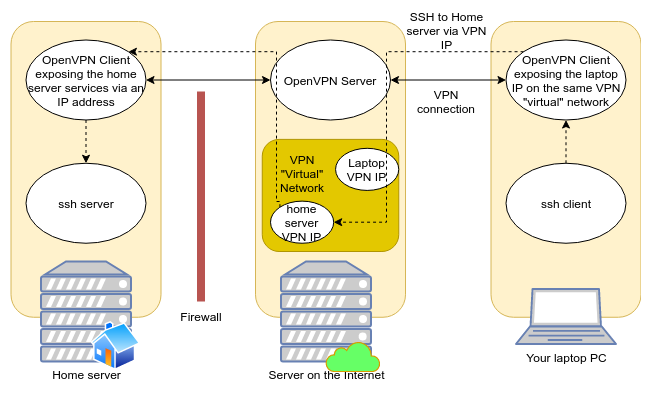
Figure 3: OpenVPN topology.
After setting up OpenVPN like I will outline below, one can simply run ssh 10.100.0.10, if the home server’s VPN “virtual” IP is 10.100.0.0. Other
services hosted on the home server are also accessible by that IP.
§Steps to set up (based off my playbooks)
The following steps are based off of the official OpenVPN tutorial for setting up multiple clients with their own certificates. This means a compromise of one client’s private key will not compromise the integrity of other client private keys.
§Set up the certificate authority & certificates
# Download EasyRSA
VERSION=3.0.7
curl -O easy-rsa-${VERSION}.tar.gz \
    https://github.com/OpenVPN/easy-rsa/archive/v${VERSION}.tar.gz
tar -xzvf easy-rsa-${VERSION}.tar.gz
cd easy-rsa-${VERSION}/easyrsa3

# Get script usage (it does not understand --help)
./easyrsa help

# One-time CA and DH params initialization
./easyrsa init-pki
echo 'My Cool CA Name' | ./easyrsa build-ca nopass
./easyrsa gen-dh

# Do this for each OpenVPN Server.  Each server name
# (e.g. "my_server") must be unique.
./easyrsa build-server-full my_server nopass

# Do this for each OpenVPN Client.  Each client name
# (e.g. "my_client") must be unique.
./easyrsa build-client-full my_client nopass
The generated files used later in the install are:
pki/ca.crt- The certificate authority public
certificate. Install alongside any other
another
*.crtfile. (Or maybe chain them?) pki/private/ca.key- The certificate authority private certificate.
pki/dh.pem- Diffie Hellman parameters, TODO what is this for? Install on the server.
pki/issued/my_server.crt- The server public certificate. Install on the server.
pki/private/my_server.key- The server private certificate. Install on the server.
pki/issued/my_client.crt- The client public certificate. Install on the client.
pki/private/my_client.key- The client private certificate. Install on the client.
I currently do not have the CA management scripted by Ansible. I am a little uncomfortable with the idea of Ansible entirely managing the CA creation followed by certification creation. More experience with Ansible should help put my concerns at ease. Chiefly, I don’t want Ansible to write out certificates from the “master CA tree”. Sometimes a little manual operation is pgood.
§Set up the OpenVPN Server (Internet-side)
See the corresponding Ansible role’s tasks.
The server’s openvpn.conf should look like this:
tls-server

port 12345

proto udp

dev tun0

ca /etc/openvpn/secrets/ca.crt
cert /etc/openvpn/secrets/{{inventory_hostname}}.crt
key /etc/openvpn/secrets/{{inventory_hostname}}.key
dh /etc/openvpn/secrets/dh.pem

server 10.100.0.0 255.255.255.0

persist-key
persist-tun

ifconfig-pool-persist ipp.txt
push "route 10.100.0.0 255.255.255.0"

keepalive 10 120
comp-lzo

user openvpn
group openvpn

status openvpn-status.log
log /var/log/openvpn/openvpn.log
verb 4
This is probably the easiest part.
- Install OpenVPN.
apk add openvpn - Install the CA keypair.5
- Install the VPN server’s keypair.
- Install the Diffie Hellman parameters file.
- Install the server’s openvpn.conf
- Run the server
openvpn --config /etc/openvpn/openvpn.conf
§Set up the OpenVPN Client (Your Firewalled Host)
See the corresponding Ansible role’s tasks.
The client’s openvpn.conf should look like this:
client

proto udp

dev tun0

remote public.example.com 12345

nobind
resolv-retry 30

script-security 2

ca /etc/openvpn/secrets/ca.crt
cert /etc/openvpn/secrets/{{inventory_hostname}}.crt
key /etc/openvpn/secrets/{{inventory_hostname}}.key

persist-key
persist-tun

keepalive 10 120
comp-lzo

log /var/log/openvpn/openvpn.log
verb 4
- Install OpenVPN.
apk add openvpn - Install the CA public key.
- Install the VPN Client’s keypair.
- Install the client’s openvpn.conf
- Run the client using
openvpn --config /etc/openvpn/openvpn.conf
§Set up another OpenVPN client on your PC
Follow the same instructions as setting up your firewalled host, but be sure to generate a unique SSL keypair to identify your PC. If the OpenVPN server, the firewalled host OpenVPN client, and your PC’s OpenVPN client are all set up correctly, you should be able to directly connect to any of the hosts participating in the VPN via the VPN’s private IPv4 network.
§Wishlist
This setup works swimmingly, but there are a few nits in the amount of effort involved in discovering hosts connected to the VPN. I also realized instead of only routing directly to other VPN clients, one could also join the various LANs, so I gave that some thought as well.
§VPN Host Discovery
At present I scan for remote connected hosts via:
winston@snowcrash ~ $ sudo nmap -sP -PE 10.100.0.0/24
Password:
Starting Nmap 7.80 ( https://nmap.org ) at 2020-08-15 01:31 CDT
Nmap scan report for 10.100.0.1
Host is up (0.026s latency).
Nmap scan report for 10.100.0.6
Host is up (0.053s latency).
Nmap scan report for 10.100.0.14
Host is up (0.064s latency).
Nmap scan report for 10.100.0.10
Host is up.
Nmap done: 256 IP addresses (4 hosts up) scanned in 2.61 seconds
-sP for ping scan, -PE to discover hosts via ARP lookup (no ICMP pings or TCP probes), and 10.100.0.0/24 to scan every host in the 10.100.0.x subnet.
In the above output, 10.100.0.1 is the OpenVPN server
address, and according to ip addr show dev tun0, my
current OpenVPN client is 10.100.0.10.
Pretty icky. Alternatively, one can take a look at the server’s openvpn.log:
Fri Aug 14 02:02:48 2020 us=357198 cyberdemon/127.0.0.1:42995 MULTI: primary virtual IP for cyberdemon/127.0.0.1:42995: 10.100.0.18
cyberdemon has IP 10.100.0.18
In both cases it’s a bit tedious to figure out which IP belongs to which host participating on the VPN.
DNS-SD (via Avahi) might be suitable for this. Instead of scanning for
available hosts, one can simply query for a DNS-SD (DNS Service Discovery)
type, quite possibly either _http._tcp or _ssh._tcp. Here is one such
guide.
§Domain Names for VPN Hosts
An related wish (which overlaps in some ways) is to configure OpenVPN to register VPN clients’ information including their assigned IP address with a DNS server such as dnsmasq or tinydns or even busybox’s dns server. I did some skimming about this, and came up with the conclusion that it’s possible, but is not well understood or documented, so I decided to go with host discovery via network scanning for the time being.
§Configure the VPN Clients’ LAN segments be routable from other Clients
This is a killer feature I have yet to figure out. It appears possible, but this requires a bit of further testing, and is relatively tricky to set up correctly, since if a VPN Client ends up using the same IP network in two different contexts, things will silently stop working without explanation, because that’s as intended, IP is funny like that.
-
2001:db8:a:b::/64is part of2001:db8::/32which is reserved for documentation in RFC 3849. ↩︎ -
203.0.113.1is part of203.0.113.0/24(TEST-NET-3) which is reserved for documentation in RFC 5737. ↩︎ -
Devices could be configured on the IPv4 LAN with so-called static IPv4 addresses, but usually you don’t want this. You can achieve the same by assigning hosts the same IPv4 every time (which are identified the network interface’s MAC address or even the optional hostname field). ↩︎
-
In this example I use
192.168.1.0/24which is reserved for private network use in RFC 1918. ↩︎ -
The CA private key is likely not necessary and probably a serious smell, if you know anything about this, please write me explaining this. ↩︎