I seem to have a lot of suggestions to share with friends about managing disks on a linux livecd. Here are some of the tips I’d like to share. See the table of contents above for a breakdown of the topics discussed.
Some disk related topics are out of scope for this article, as they deserve their own blog post. The topics not covered include partitioning, setting up a boot loader, using LVM2 or ZFS, that sort of thing. This is more about working with existing data, and general advice.
§Use the right tools for the job
Much of this article is about using the right tools for the job, but first I
want to recommend checking out the GRML Linux LiveCD. It isn’t super
flashy, but it gets the job done, ships with virtually every tool a competent
Linux user would need to fix up a system. Maybe write it to a usb using
grml2usb and use persistence. This way you can keep your terminal
hardcopies/logs handy.
§Finding the disk/partitions to work with
My usual way is to first check dmesg output for detection of storage
devices. It will look something like this:
[    1.611027] ata2.00: ATA-10: ST4000DM004-2CV104, 0001, max UDMA/133
[    1.611029] ata2.00: 7814037168 sectors, multi 16: LBA48 NCQ (depth 32), AA
[    1.661247] ata2.00: configured for UDMA/133
[    1.661570] scsi 2:0:0:0: Direct-Access     ATA      ST4000DM004-2CV1 0001 PQ: 0 ANSI: 5
[    1.661653] sd 2:0:0:0: Attached scsi generic sg1 type 0
[    1.661663] sd 2:0:0:0: [sdb] 7814037168 512-byte logical blocks: (4.00 TB/3.64 TiB)
[    1.661664] sd 2:0:0:0: [sdb] 4096-byte physical blocks
[    1.661668] sd 2:0:0:0: [sdb] Write Protect is off
[    1.661669] sd 2:0:0:0: [sdb] Mode Sense: 00 3a 00 00
[    1.661675] sd 2:0:0:0: [sdb] Write cache: enabled, read cache: enabled, doesn't support DPO or FUA
[    1.688240] sd 2:0:0:0: [sdb] Attached SCSI removable disk
Then if unsure I like to check the output of lsblk and parted -l1. They
look like this:
$ lsblk
NAME                                          MAJ:MIN RM   SIZE RO TYPE  MOUNTPOINT
sda                                             8:0    1   3.7T  0 disk
└─md127                                         9:127  0   3.7T  0 raid1
  └─GreenCrypt                                253:3    0   3.7T  0 crypt
    ├─Green-docker                            253:4    0   100G  0 lvm   /var/lib/docker
    ├─Green-binpkgs                           253:5    0   100G  0 lvm   /var/cache/binpkgs
    ├─Green-distfiles                         253:6    0   100G  0 lvm   /var/cache/distfiles
    ├─Green-main                              253:7    0     1T  0 lvm   /mnt/stuff
    ├─Green-games                             253:8    0   750G  0 lvm   /mnt/games
    ├─Green-vm                                253:9    0   250G  0 lvm
    └─Green-wine                              253:10   0   250G  0 lvm
sdb                                             8:16   1   3.7T  0 disk
└─md127                                         9:127  0   3.7T  0 raid1
  └─GreenCrypt                                253:3    0   3.7T  0 crypt
    ├─Green-docker                            253:4    0   100G  0 lvm   /var/lib/docker
    ├─Green-binpkgs                           253:5    0   100G  0 lvm   /var/cache/binpkgs
    ├─Green-distfiles                         253:6    0   100G  0 lvm   /var/cache/distfiles
    ├─Green-main                              253:7    0     1T  0 lvm   /mnt/stuff
    ├─Green-games                             253:8    0   750G  0 lvm   /mnt/games
    ├─Green-vm                                253:9    0   250G  0 lvm
    └─Green-wine                              253:10   0   250G  0 lvm
sr0                                            11:0    1     2K  0 rom
nvme0n1                                       259:0    0 931.5G  0 disk
├─nvme0n1p1                                   259:1    0     2M  0 part
├─nvme0n1p2                                   259:2    0   977M  0 part  /boot
└─nvme0n1p3                                   259:3    0 930.6G  0 part
  └─luks-27598b7a-dbfd-4e5a-a5b1-4de8618b66ed 253:0    0 930.6G  0 crypt
    ├─Gentoo-Root                             253:1    0   250G  0 lvm   /
    └─Gentoo-Home                             253:2    0   250G  0 lvm   /home
and parted -l:
$ sudo parted -l
Error: /dev/sda: unrecognised disk label
Model: ATA ST4000DM004-2CV1 (scsi)
Disk /dev/sda: 4001GB
Sector size (logical/physical): 512B/4096B
Partition Table: unknown
Disk Flags:

Error: /dev/sdb: unrecognised disk label
Model: ATA ST4000DM004-2CV1 (scsi)
Disk /dev/sdb: 4001GB
Sector size (logical/physical): 512B/4096B
Partition Table: unknown
Disk Flags:

Model: Samsung SSD 980 PRO 1TB (nvme)
Disk /dev/nvme0n1: 1000GB
Sector size (logical/physical): 512B/512B
Partition Table: gpt
Disk Flags:

Number  Start   End     Size    File system  Name   Flags
 1      1049kB  3146kB  2097kB               grub   bios_grub
 2      3146kB  1028MB  1024MB  fat32        boot   boot, esp
 3      1028MB  1000GB  999GB                crypt


Error: /dev/md127: unrecognised disk label
Model: Linux Software RAID Array (md)
Disk /dev/md127: 4001GB
Sector size (logical/physical): 512B/4096B
Partition Table: unknown
Disk Flags:
Just a brief note on the above outputs. The astute reader will notice that the
two /dev/sdX disks have no partitioning. This is intentional. They form a
Linux md RAID1 (mirror) with a LUKS volume on top of it. In the LUKS volume is
a LVM2 volume group with logical volumes containing filesystems. The attentive
reader will also notice my NVME device has a tiny partition called grub and a
boot partition. The tiny partition has a BIOS MBR bootblock so if I boot
the drive on a Legacy BIOS system, it will work fine. It will also boot fine
on a EFI system.
§Write/read to the least ambiguous device file
On Linux there is a directory in the dev filesystem called /dev/disk within
it is subdirectories that each contain symbolic links to top a device file
referring to a disk or partition.
When referring to a specific disk, use /dev/disk/by-id/…. Use this when
doing a disk wiping or copying operation. To figure out which symbolic link
belongs to a given disk or partition, (1) figure out how the device is known to
the kernel [e.g. SATA/ATA, DM, LVM, MD, NVME, etc.] and (2) Determine the
vendor or identifying bits. For example in the following listing
ata-ST4000DM004-2CV104_ZFN3QBWB indicates the way the kernel knows about it
(ata bus), the product/model (ST4000DM004), and the serial number
(2CV104_ZFN3QBWB). Example listing:
$ ls /dev/disk/by-id/
ata-HL-DT-ST_BD-RE_WH16NS60_KLZKBPA5625
ata-ST4000DM004-2CV104_ZFN3QBWB
ata-ST4000DM004-2CV104_ZFN3QE4B
dm-name-Gentoo-Home
dm-name-Gentoo-Root
dm-name-Green-binpkgs
dm-name-GreenCrypt
dm-name-Green-distfiles
dm-name-Green-docker
dm-name-Green-games
dm-name-Green-main
dm-name-Green-vm
dm-name-Green-wine
dm-name-luks-27598b7a-dbfd-4e5a-a5b1-4de8618b66ed
dm-uuid-CRYPT-LUKS1-27598b7adbfd4e5aa5b14de8618b66ed-luks-27598b7a-dbfd-4e5a-a5b1-4de8618b66ed
dm-uuid-CRYPT-LUKS2-704eca588f574f53989e56511d731366-GreenCrypt
dm-uuid-LVM-Mn6J1pC3IAss0h6SeXMprDWETuJIO1u12TZqwz7032u90NNlBZAZKka3q1MBPDQX
dm-uuid-LVM-Mn6J1pC3IAss0h6SeXMprDWETuJIO1u1dOHiDShY70TBuOwGIZWHqM9ZeH7Rv8PX
dm-uuid-LVM-Mn6J1pC3IAss0h6SeXMprDWETuJIO1u1IFQqGeDM7iVgxpsQ6cm5EB2BqPUhX6bh
dm-uuid-LVM-Mn6J1pC3IAss0h6SeXMprDWETuJIO1u1j1XAaN5vwHET3tKQR23zfEbp1RbZCPuK
dm-uuid-LVM-Mn6J1pC3IAss0h6SeXMprDWETuJIO1u1O2ZRvhU09h3yzBTd1f6zw1dHRf0Qo7S5
dm-uuid-LVM-Mn6J1pC3IAss0h6SeXMprDWETuJIO1u1ovnv0hlexflX4BTUjA0xPcci44r1mc8u
dm-uuid-LVM-Mn6J1pC3IAss0h6SeXMprDWETuJIO1u1RfJEbazLLfbZd9HIhywT15SV0xSKhpOX
dm-uuid-LVM-PBcl0Ob6IYesLjLqwD3sSBTyxLksGZQZCrC6hnwkt6YuiuK6LqIdrlyCAOiqGWlc
dm-uuid-LVM-PBcl0Ob6IYesLjLqwD3sSBTyxLksGZQZJjezl04d5raF8ig7sEpwVDb3a6O6aE83
lvm-pv-uuid-7PCs67-4Sui-iGgU-96iF-EEig-scFA-3P3Fqu
lvm-pv-uuid-ZnVpNS-ZBBe-hqfW-mCHz-nHdd-PdRt-wUiIoU
md-name-snowcrash:green
md-uuid-21b822f6:261a0dde:62101e46:1721c196
nvme-eui.002538b111502115
nvme-eui.002538b111502115-part1
nvme-eui.002538b111502115-part2
nvme-eui.002538b111502115-part3
nvme-Samsung_SSD_980_PRO_1TB_S5P2NG0R104509J
nvme-Samsung_SSD_980_PRO_1TB_S5P2NG0R104509J-part1
nvme-Samsung_SSD_980_PRO_1TB_S5P2NG0R104509J-part2
nvme-Samsung_SSD_980_PRO_1TB_S5P2NG0R104509J-part3
wwn-0x5000c500c72479fc
wwn-0x5000c500c724acf4
When setting up a computer to mount a disk, one probably wants to use
/dev/disk/by-uuid/… . This includes what gets added to /etc/fstab or
systemd *.mount units. See also blkid to list disk names next to their UUIDs. Example listing:
$ ls /dev/disk/by-uuid/
261b43e8-c723-4642-b5eb-44204d778003  397f131d-bd83-4d2a-9c37-9601ed1d0b66  6c6e0ba9-5894-475c-833a-be4f4b3400bc  c6af6618-c8f4-401c-9a8b-5265de07b508
27598b7a-dbfd-4e5a-a5b1-4de8618b66ed  4262a448-bb54-4c48-bb66-af8c9c39a395  704eca58-8f57-4f53-989e-56511d731366  dcf2856e-00b4-4b7f-abd8-da374643c1f4
28D2-FF4B                             5d2bfaaf-1ac0-40f6-9a4b-5195d5dd39df  74e0024f-b4db-4518-ba90-2889f99a2cd0  e4e1f10b-2f47-4717-b439-d5836337a486
For clarity, here is the output of blkid:
$ blkid
/dev/sda: UUID="21b822f6-261a-0dde-6210-1e461721c196" UUID_SUB="3ccf1aa1-3138-5367-1349-959ba89f5bfa" LABEL="snowcrash:green" TYPE="linux_raid_member"
/dev/sdb: UUID="21b822f6-261a-0dde-6210-1e461721c196" UUID_SUB="bd74d02c-d8c7-151a-985d-94863daebac1" LABEL="snowcrash:green" TYPE="linux_raid_member"
/dev/nvme0n1p2: UUID="28D2-FF4B" BLOCK_SIZE="512" TYPE="vfat" PARTLABEL="boot" PARTUUID="91a9f1e5-9187-4bc2-8572-273ac53e70b9"
/dev/nvme0n1p3: UUID="27598b7a-dbfd-4e5a-a5b1-4de8618b66ed" TYPE="crypto_LUKS" PARTLABEL="crypt" PARTUUID="f160a31f-3103-4ece-b3f0-37ed1459e14e"
/dev/mapper/luks-27598b7a-dbfd-4e5a-a5b1-4de8618b66ed: UUID="ZnVpNS-ZBBe-hqfW-mCHz-nHdd-PdRt-wUiIoU" TYPE="LVM2_member"
/dev/mapper/Gentoo-Root: UUID="4262a448-bb54-4c48-bb66-af8c9c39a395" BLOCK_SIZE="4096" TYPE="ext4"
/dev/md127: UUID="704eca58-8f57-4f53-989e-56511d731366" TYPE="crypto_LUKS"
/dev/mapper/Gentoo-Home: UUID="261b43e8-c723-4642-b5eb-44204d778003" BLOCK_SIZE="4096" TYPE="ext4"
If you’re looking for a one-off command to test what logical device
(e.g. /dev/sdX owns a given /dev/disk/by-uuid), try using ls -l or
readlink -f:
winston@stargate ~ $ readlink -f /dev/disk/by-id/ata-ST4000DM004-2CV104_ZFN3QBWB
/dev/sdb
winston@stargate ~ $ ls -l /dev/disk/by-id/ata-ST4000DM004-2CV104_ZFN3QBWB
lrwxrwxrwx 1 root root 9 Jan 24 18:34 /dev/disk/by-id/ata-ST4000DM004-2CV104_ZFN3QBWB -> ../../sdb
§Exceptions to the rules
Some exceptions to the above rules include:
-
When using Logical Volumes, always refer to the Logical Volume by its LVM2 device mapping path. For example this would be like
/dev/mapper/YOUR_VG-YOUR_LV. In the above outputs I have a LVM2 VG calledGentooand a Logical Volume calledHome. I’d refer to this LV via/dev/mapper/Gentoo-Home.This is recommended because one can create a LVM2 snapshot of a logical volume, thereby causing the contents of the disk to be available at two different locations in the volume group. This has the nasty habit of causing confusion when using UUIDs with logical volumes, as the kernel can’t know which volume with the same exact UUID to choose from, and will chose the wrong one sometimes. (See this blog post.)
-
When (re-)attaching disks to a ZFS ZPool, always use
/dev/disk/by-id/…. Do not use UUIDs. This will have unintended consequences; for example ZFS will create partitions with the same UUIDs across a mirror. (See this Reddit discussion.)
§Use GNU ddrescue
This is probably the biggest advice I have, because dd sucks. Nobody has
time to remember yet another unix tool’s esoteric syntax, especially one that
is not designed to look like other unix tools. In most use-cases, dd is
treated like a glorified cat. It does have some basic data recovery
features, and a way to show progress, but it’s not very easy to work with.
Let’s say your dd gets interrupted half way doing a disk imaging task. Time
to start over from the beginning! Let’s say your dd encounters an error.
Sure you could try to get dd to work past that error via conv=noerror, but
why think about that when there are tools that can handle this for you
automatically? Most importantly dd requires the user to determine the
optimal block size, which is nontrivial, as described in this StackOverflow
post.
Enter GNU ddrescue. It has this feature called the “mapfile”, which is a
sort of journal indicating how much of the input has been copied to the output.
It also is used to indicate where data recovery (if required) was successful
and where it was not. ddrescue also chooses the optimal block size for you,
so it should run as fast as the system supports. ddrescue also has robust
recovery facilities. It attempts a few passes before giving up, each pass is
done in a different way from the previous. In the few times I’ve needed this
feature, it has managed to recover some data. It’s not perfect, but it should
be a good start.2
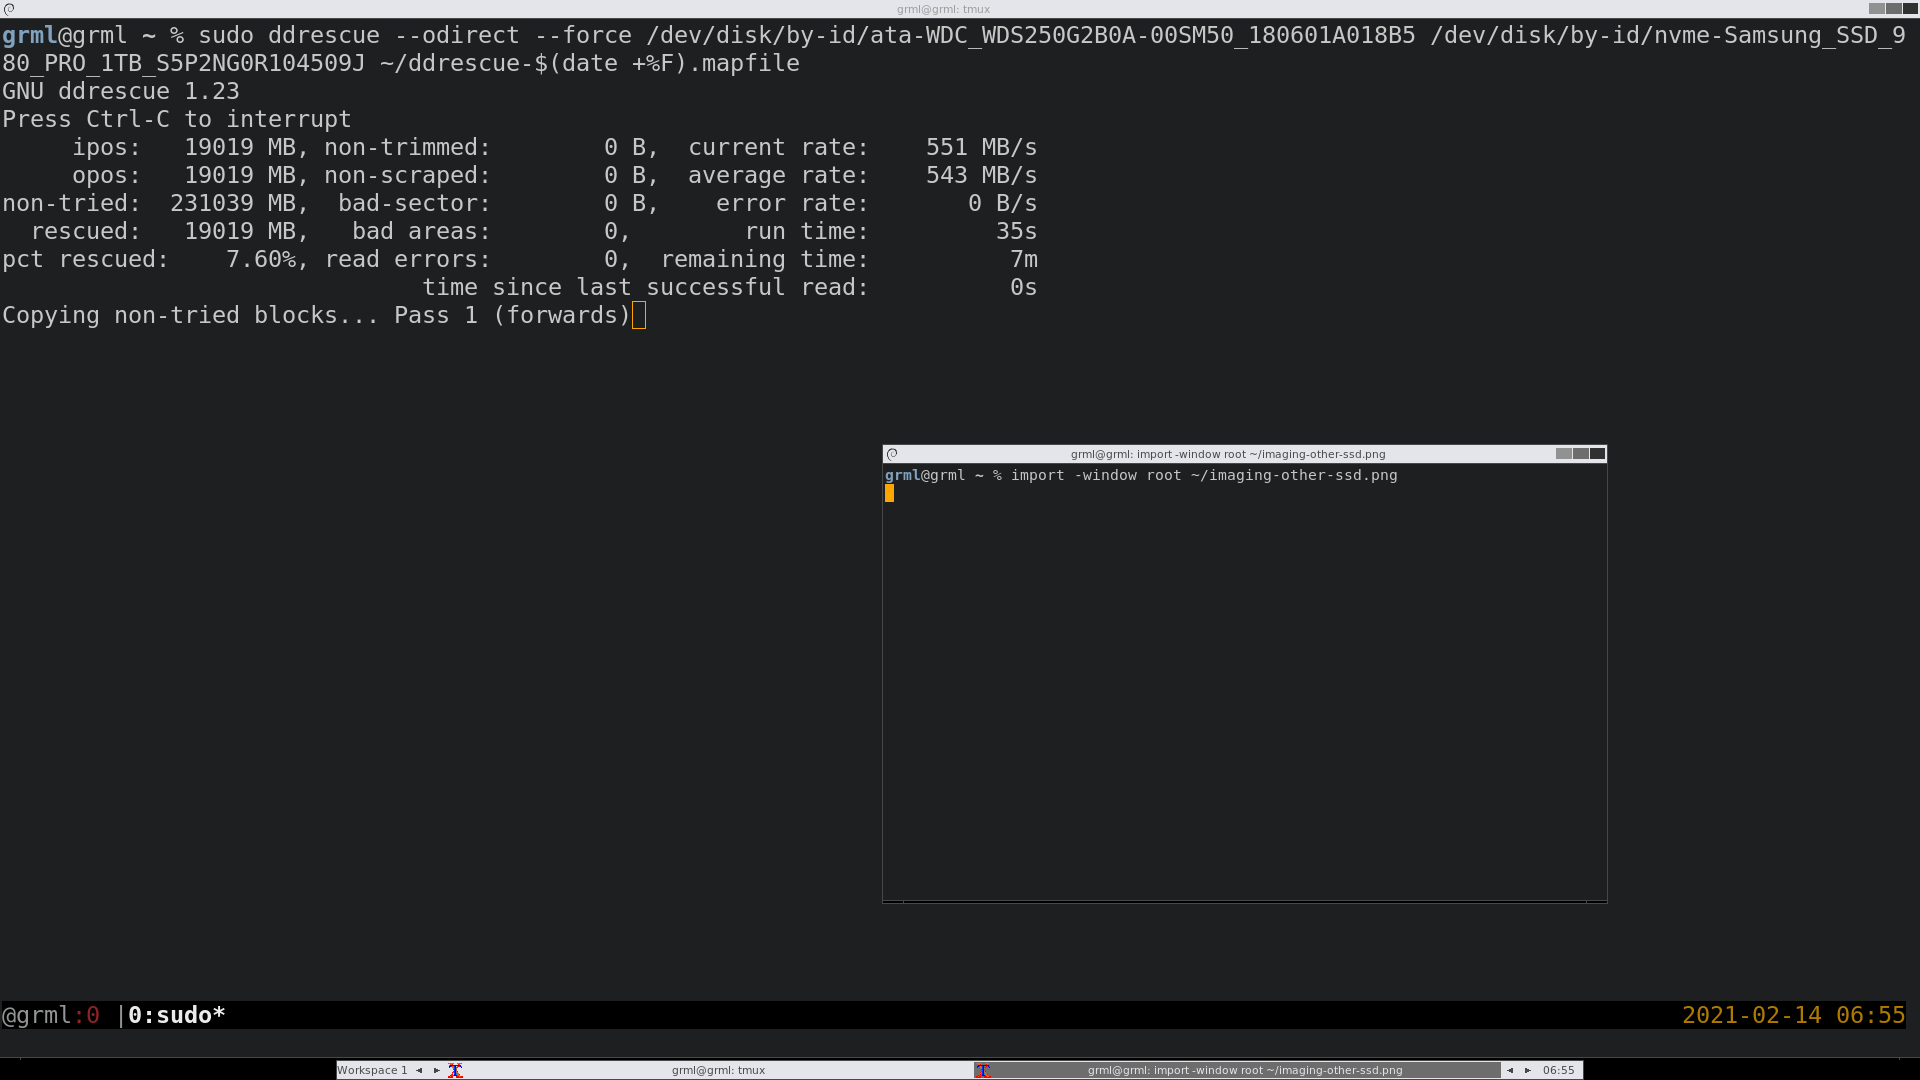
§ddrescue in action
Let’s start with an easy example. Let’s say you want to migrate your
installation to a new disk. You could use a cat or dd, or you could use
ddrescue and get all this output, and record the status as you go, in case of
power failure or whatever reasons.
- Discover the source and destination disks using the above techniques.
Usually it’s just enough to find the files that looks like what you want in
/dev/disk/by-id/, or runlsblk. Cross reference againstdmesgoutput. - Run
ddrescue --odirect --force source dest your.mapfile. Ifddrescueis interrupted for whatever reason, just rerun the same command. If you use/dev/disk/by-id/it should do the same exact operation with the same exact disks. It should also continue where it left off thanks to the mapfile. The--forceis needed when the output is a device file, or already exists. The--odirecttellsddrescueto bypass the kernel IO buffering, which will give a better picture on imaging progression.
That’s it. Here is a screenshot from a recent session:
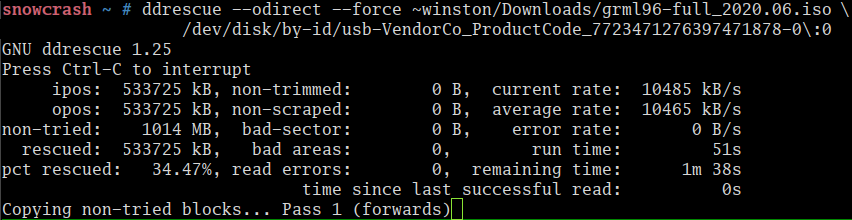
Note, this also works for thumb drives, such as in the below screenshot:
§Get your money’s worth - using ddrescue for recovery
Everyone knows they need proper backups, but even with this advice constantly
spouted like gospel, users occasionally lose data due to things like as a
failing disk or faulty controller. Sometimes it’s user error and the user
accidentally deletes data that is not backed up. ddrescue can help recover
from the former issue where hardware issues cause disk to fail.
Note: When recovering from a failing disk. Run ddrescue on the disk, then
make the recovered image file read only. Make a full (or CoW3) copy of the recovered
image file. Work on this copy. This way if one messes up fixing the damaged
data on the disk image, it is possible to restart the process without
re-reading the failed disk (which will risk more data loss).
In most ways the way to run ddrescue is the same when recovering data.
Admittedly I have only had to recover data from one disk recently, and it was
only slightly damaged, but this should work for virtually all use cases.
- Discover the source and destination disks like in the above example.
- Run
ddrescue --idirect source your-dest-file your.mapfile. Notice there is no--forceor--odirect. One could add the--odirectback on, but there isn’t necessary, because data recovery takes a long time, and the bottleneck won’t be your destination filesystem’s write speed. The--idirecttellsddrescueto try to manipulate the disk directly, which can result in more data recovered (see the info pages).
Here is an excerpt from a screen session demonstrating disk recovery. This recovery recovered all but a couple MB of a damaged disk. I was able to re-write the image to a new disk, and Windows 10 booted, fixed the filesystem corruption, and ran fine:
130 root@grml ~ # ddrescue --idirect -r 2 -P /dev/disk/by-id/scsi-SATA_WDC_WD10E
ADS-65M_WD-WCAV5C853599 ~grml/mnt/silo/mnt/backup/bulk/2021-02-21/disk.dd ~grml/
mnt/silo/mnt/backup/bulk/2021-02-21/disk.map
GNU ddrescue 1.23
Press Ctrl-C to interrupt
Initial status (read from mapfile)
rescued: 1000 GB, tried: 14480 kB, bad-sector: 14480 kB, bad areas: 1165

Current status
Data preview:
DBAC28C000  98 00 00 00 02 00 00 00  80 36 00 00 00 00 49 03  .........6....I.
DBAC28C010  B6 1A 07 00 00 00 2B 00  00 90 2E D5 0E 00 00 00  ......+.........
DBAC28C020  82 BB A6 E6 13 BC D5 01  02 00 00 00 00 00 00 00  ................

     ipos:  943486 MB, non-trimmed:        0 B,  current rate:    3072 B/s
     opos:  943486 MB, non-scraped:        0 B,  average rate:      97 B/s
non-tried:        0 B,  bad-sector:    7465 kB,    error rate:       0 B/s
  rescued:    1000 GB,   bad areas:     4943,        run time:     20h 44s
pct rescued:   99.99%, read errors:    26417,  remaining time:      6h  1m
                              time since last successful read:         n/a
Finished
ddrescue --idirect -r 2 -P  ~grml/mnt/silo/mnt/backup/bulk/2021-02-21/disk.dd  6
.73s user 4.34s system 0% cpu 20:00:43.95 total
root@grml ~ #
Notice the data preview in the above (-P). While non-functional, it can indicate
the sort of data being recovered (e.g. is it mostly zeros or images, etc).
§Monitor dmesg for errors
Sometimes when doing disk copying, you’ll get long hangs. Some devices,
especially USB attached mass storage devices, will behave strangely, and hang,
then reset the usb link. If you’re lucky the kernel will reassign it the same
device files (e.g. /dev/sdc could show up again as /dev/sdc), but in some
cases it’ll show up differently. Even ddrescue will complain about this and
give up.
I usually fire up dmesg --human --follow --reltime in a separate tmux/screen
window.
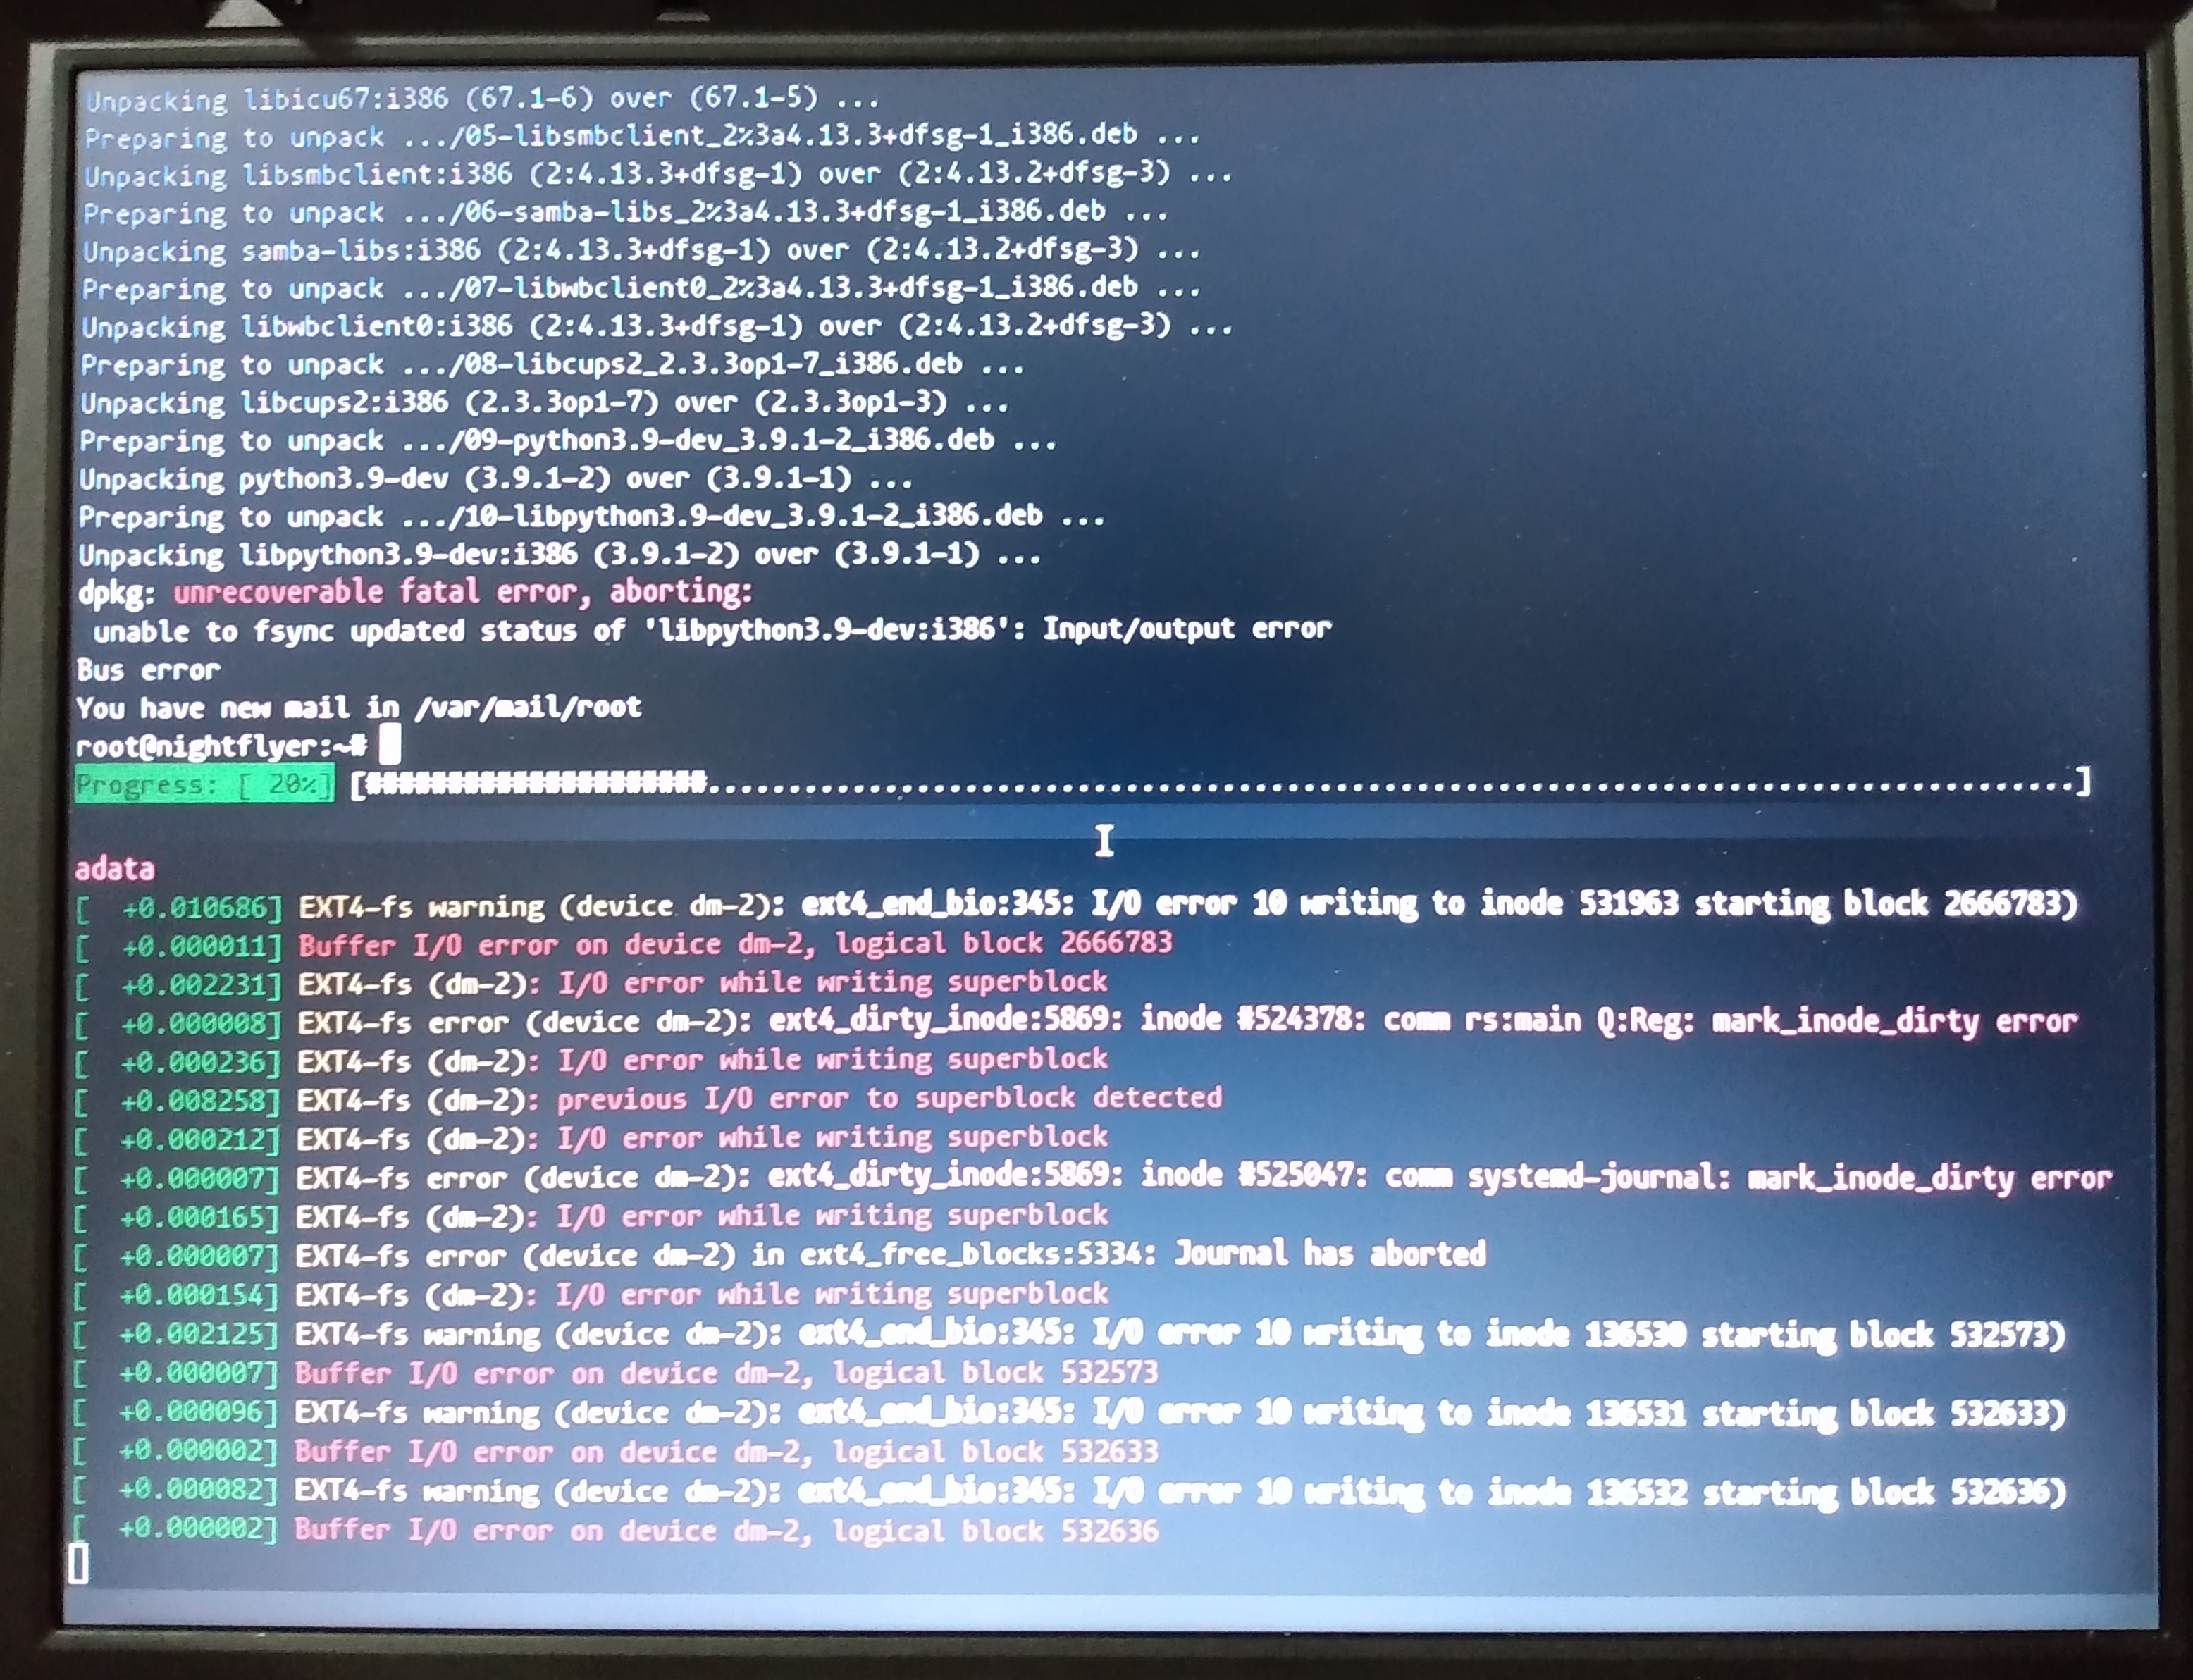
Here’s an example of a Thinkpad’s disk failing during an upgrade, clearly
indicated in dmesg:
§Always run your task in a tmux or screen session
When you close your terminal, the shell is sent SIGHUP, which then in turn sends SIGHUP to each process controlled by that shell. Most tools do not try to recover from a Hangup, and will exit when possible. This can have unintended consequences if you are doing sensitive things such as resizing a filesystem.
One work around is to use nohup which runs the task with the hangup signal
ignored, so the task can continue after the user logs out (or closes terminal).
See info coreutils nohup or man nohup. I don’t recommend this method, but
it’s important to know what choices one has.
The best work around is to use either tmux or screen to run your task in a
terminal multiplexer that runs in a terminal emulator. These tools are
extremely powerful and can do a lot more than what is needed for this use
case. Just run screen. You’ll get a new shell. Run your command here.
Type C-a d to detach from the session. Run screen -rad to re-attach the
session so you can watch progress, such as in case the window was accidentally
closed. For tmux, just run tmux, then run your command. Type C-b d to
detach, and run tmux attach-session to reattach to the session. See man screen and man tmux for more information.
I am naked without a terminal multiplexer. It’s used in virtually every terminal I open, because it’s just a lot easier to work with than dealing with where the heck I put some random terminal or accidentally closing out my desktop session.
§Wiping disks
There are few options:
nwipe /dev/…blkdiscard /dev/…cat /dev/zero > /dev/…shred /dev/…
If you’re on a SSD, you can probably make do with running a blkdiscard on the
device file (blkdiscard /dev/…). Be sure to check the manpage man blkdiscard.
If you’re using a device that blkdiscard doesn’t work with, it might be a
good idea to check out nwipe, which provides a nice Text User Interface (TUI)
to configure the wiping, then do the wipe. It can do all sorts of erasure
patterns, including some FIPS data security standard. It can also do a simple
zero-ing. Fun fact, nwipe is forked from dwipe. dwipe is DBAN’s secret
sauce; so next time don’t use DBAN, just use a general purpose LiveCD with
nwipe bundled, like GRML or systemrescuecd.

Otherwise just pipe /dev/zero to the device file. cat or pv (pv shows
progress) will do (try pv /dev/zero > /dev/disk/by-id/…). An honorable
mention goes to GNU shred /dev/disk/by-id/…, bundled with Coreutils. It acts
like a slightly better cat /dev/urandom > /dev/disk/by-id/… ran three
times in a row.4
§Conclusion
I hope this helps describe some of the steps I take when working with disks on Linux. Here are some additional resources to look over to learn more:
- Archlinux Wiki - Category:File systems
- Gentoo Handbook:AMD64 - Perparing the Disks
- Software documentation:
ddrescuedocumentation (info ddrescue)parteddocumentation (info parted)nwipedocumentation (man nwipe)blkdiscarddocumentation (man blkdiscard)shreddocumentation (info coreutils shred)blkiddocumentation (man blkid)lsblkdocumentation (man lsblk)nohupdocumentation (info coreutils nohup)tmuxdocumentation (man tmux) (See also this nice guide.)screendocumentation (info screen)
§Portability of this article
Most of what was discussed maps at a high level to other OSes. For example one
can use GPT partition UUIDs to identify partitions on FreeBSD; a similar
feature exists on OpenBSD. And for OSes that don’t have a UUID feature,
filesystem labels always are an option. Anything that doesn’t depend on the
automatic kernel enumeration of the drives is good in my book (read: no sdX).
ddrescue installs on most Unix-likes, though unfortunately parted,
lsblk, nwipe, and blkdiscard are all Linuxy stuff, but there don’t appear
to be any nice-to-use cross-patform tools to recommend as an alternative.
Thankfully the concepts map roughly 1:1 (except for weird stuff like BSD disk
labels, which are like LVM2’s younger brother.)
For the most part, using fdisk -l or similar, paired with dmesg will show
what you need to know about disks on your Unix-like of choice.
-
fdisk -l,cfdisk -l,gdisk -lwork too, butpartedhas a simple interface and can do virtually everything thefdisklike tools can do, with a better interface. ↩︎ -
It turns out even
ddrescueisn’t perfect. If it fails you, maybe try some other tools, or send the drive to be recovered by professionals. Software, like their authors, is not perfect and infallible. ↩︎ -
Copy on Write. See Wikipedia. LVM2, ZFS, BTRFS all support this. ↩︎
-
Thanks to DiffieHellmen for reminding me of GNU
shred. ↩︎