Extending a wireless LAN with a bridged Ethernet LAN using Mikrotik RouterOS
Updated Sunday, Sep 1, 2024
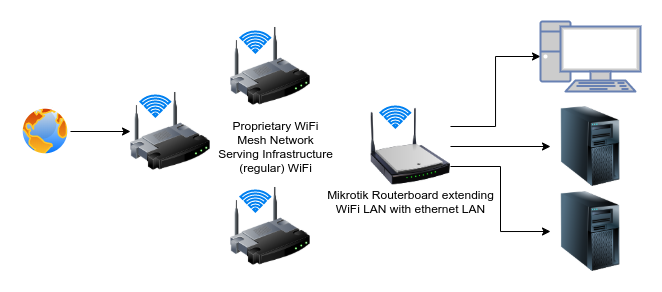
I recently moved, and my new abode has an Ubiquiti Amplifi LAN. The rationale is this mesh-based WiFi network eliminates the need to install Ethernet between Wireless Access Points (APs). It works surprisingly well. In this post I document how I extended this network so I could place my networked devices all on the same Ethernet segment, without needing to wire it to the Amplifi base station.
The idea is the network should look like this:
§Multiple Subnets Gotcha: No static routes or additional IP addresses on the Amplifi Router
Initially I wanted to segment my devices on its own RFC1918
network. The idea is the main Amplifi LAN would be on
192.168.182.0/24 and my network would be on 10.9.8.0/24. I know
I can ensure an address from each subnet is on each router, and the
routers should then be able to route between each other without any
additional configuration.
Unfortunately Amplifi does not offer a facility to add additional IP addresses to the LAN IP configuration. Think about how absurd that is—a router doesn’t offer facility to add multiple addresses on an interface or bridge. Yep pretty silly. This leads me to the second approach: add static routes to make every segment on the network routable. Unfortunately, yet again, Ubiquiti Amplifi does not offer this standard router feature.
Given the limitations of Amplifi to not offer static routing or multiple LAN IP addresses, I think the only approach where I could maintain an additional subnet is with NAT (Network Address Translation) configured, which totally defeats the purpose of having a second subnet which could host any number of network services that should be reachable anywhere on the network, without any port forwarding.
§Configuring the Mikrotik Routerboard
My examples assume the user is logged into the CLI via SSH. Make sure to read through the RouterOS Wiki documentation and upcoming replacement wiki when things are not clear.
In particular check out the guides for scripting, using the console, first-time setup, and troubleshooting tools.
The steps are this:
§1) Make a backup of your current RouterOS configuration
About the /export and /import paths. Also worth reading about
/system backup.
[admin@MikroTik] > # Export to local file
[admin@MikroTik] > /export verbose file=2020-03-29
[admin@MikroTik] > # Confirm file exists
[admin@MikroTik] > /file print
 # NAME                                                 TYPE                                                       SIZE CREATION-TIME
 0 2020-03-29.rsc                                       script                                                  40.2KiB mar/29/2020 12:44:43
 1 flash                                                disk                                                            dec/31/1969 19:00:03
 2 flash/skins                                          directory                                                       dec/31/1969 19:00:03
 3 flash/pub                                            directory                                                       mar/20/2020 03:04:00
Then copy it over.
$ sftp admin@192.168.182.70
Connected to 192.168.182.70.
sftp> ls
2020-03-29.rsc   flash
sftp> get 2020-03-29.rsc
Fetching /2020-03-29.rsc to 2020-03-29.rsc
/2020-03-29.rsc                                                                                            100%   40KB   2.9MB/s   00:00
sftp> exit
§2) Reconfigure the bridge
You probably want everything on the bridge, including the ether1,
which is often used for WAN on a typical router setup. More
information on RouterOS bridges.
[admin@MikroTik] > /interface bridge port print
Flags: X - disabled, I - inactive, D - dynamic, H - hw-offload
 #     INTERFACE                              BRIDGE                              HW  PVID PRIORITY  PATH-COST INTERNAL-PATH-COST    HORIZON
 0   H ;;; defconf
       ether2                                 bridge                              yes    1     0x80         10                 10       none
 1 I H ;;; defconf
       ether3                                 bridge                              yes    1     0x80         10                 10       none
 2 I H ;;; defconf
       ether4                                 bridge                              yes    1     0x80         10                 10       none
 3 I H ;;; defconf
       ether5                                 bridge                              yes    1     0x80         10                 10       none
 4 I   ;;; defconf
       sfp1                                   bridge                              yes    1     0x80         10                 10       none
 5 I H ether1                                 bridge                              yes    1     0x80         10                 10       none
 6 I   wlan1                                  bridge                                     1     0x80         10                 10       none
 7     wlan2                                  bridge                                     1     0x80         10                 10       none
To add/remove devices just use /interface bridge port add and
/interface bridge port remove. Press TAB to complete stuff.
§3) Remove obsolete firewall rules
The following scripts can be copy-pasted into the terminal. More information on RouterOS scripting here.
I’ve included the following image because I think everyone should be able to enjoy the colorful nature of RouterOS’s shell.
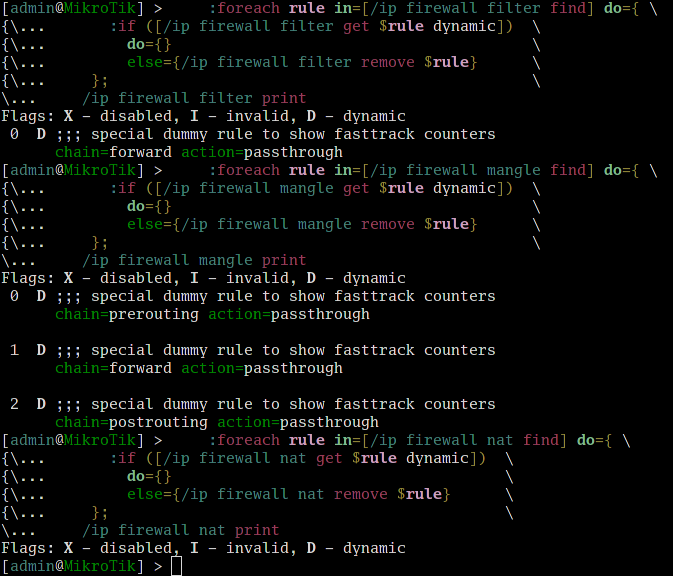
§/ip firewall filter
As per a suggestion on IRC (thanks drmessano) it’s best to drop all the firewall rules, since this device should be a L3 bridge, and should not be restricting traffic.
:foreach rule in=[/ip firewall filter find] do={ \
  :if ([/ip firewall filter get $rule dynamic])  \
    do={}                                        \
    else={/ip firewall filter remove $rule}      \
};                                               \
/ip firewall filter print
§/ip firewall mangle
I didn’t see a need for any mangle rules, so this should be empty as well.
:foreach rule in=[/ip firewall mangle find] do={ \
  :if ([/ip firewall mangle get $rule dynamic])  \
    do={}                                        \
    else={/ip firewall mangle remove $rule}      \
};                                               \
/ip firewall mangle print
§/ip firewall nat
Everything here should be disabled or removed. This setup does not use a NAT.
:foreach rule in=[/ip firewall nat find] do={ \
  :if ([/ip firewall nat get $rule dynamic])  \
    do={}                                     \
    else={/ip firewall nat remove $rule}      \
};                                            \
/ip firewall nat print
§4) Disable DHCP Server
You can probably just run:
/ip dhcp-server disable 0
This is necessary because this device shouldn’t be doling out IP addresses. Only one router on this subnet should be running a DHCP server.
§5) Configure device IP Address
§Add an out-of-band management IP address
In general it’s a good idea to add out-of-band management IP addresses to devices that don’t have another way to log in. My particular device does not have an accessible serial console, so I need to take care to always have a way to address this Routerboard, even if the LAN and its DHCP server goes down.
There are two ways to achieve this: use an IPv6 link-local address or manually add a static RFC1918 IPv4 address. I will use a static IPv4 address.
/ip address add address=10.128.0.1/24 interface=bridge
Make sure to write this address down, it will save a hard-reset down the road. Maybe attach it to the unit with a printed label.
With my Linux box’s Ethernet directly hooked up to the Routerboard, I can assign another IPv4 on the same subnet, then log into the router.
winston@snowcrash ~ $ sudo ip address add dev enp2s0 10.128.0.10/24
winston@snowcrash ~ $ ssh admin@10.128.0.1
The authenticity of host '10.128.0.1 (10.128.0.1)' can't be established.
RSA key fingerprint is SHA256:QhJryzCxFpT/wW4Mmg7R6QEnRDPeYsY2SAF/hlc7Mx4.
No matching host key fingerprint found in DNS.
Are you sure you want to continue connecting (yes/no/[fingerprint])? yes
Warning: Permanently added '10.128.0.1' (RSA) to the list of known hosts.


  MMM      MMM       KKK                          TTTTTTTTTTT      KKK
  MMMM    MMMM       KKK                          TTTTTTTTTTT      KKK
  MMM MMMM MMM  III  KKK  KKK  RRRRRR     OOOOOO      TTT     III  KKK  KKK
  MMM  MM  MMM  III  KKKKK     RRR  RRR  OOO  OOO     TTT     III  KKKKK
  MMM      MMM  III  KKK KKK   RRRRRR    OOO  OOO     TTT     III  KKK KKK
  MMM      MMM  III  KKK  KKK  RRR  RRR   OOOOOO      TTT     III  KKK  KKK

  MikroTik RouterOS 6.46.4 (c) 1999-2020       http://www.mikrotik.com/

[?]             Gives the list of available commands
command [?]     Gives help on the command and list of arguments

[Tab]           Completes the command/word. If the input is ambiguous,
                a second [Tab] gives possible options

/               Move up to base level
..              Move up one level
/command        Use command at the base level

[admin@MikroTik] >
§Provision an IPv4 on the LAN for easier management
I opted to use DHCP, but I’ll show both ways to assign an IP address to the router. Before adding more DHCP clients or a static IP, make sure to disable or remove other DHCP clients.
# Change "remove" to "disable" to keep the configuration available for later use.
foreach cl in=[/ip dhcp-client find] do={/ip dhcp-client remove $cl}; \
/ip dhcp-client print
To add a DHCP client, run a command like this:
/ip dhcp-client add interface=bridge disabled=no
To add a static IPv4 address, run commands like the following:
# Give the Routerboard an address
/ip address add address=192.168.182.70/24 interface=bridge

# The following two commands tell the Routerboard how to access the internet, so it
# can get updates or access cloud services.
#
# Where 192.168.182.1 is the default gateway (the main router)
/ip route add gateway=192.168.182.1
# Set the DNS servers preferring in order: the main router, Cloudflare, and Google
/ip dns set servers=192.168.182.1,1.1.1.1,8.8.8.8
§6) Configure the WiFi
Here is my WiFi configuration:
[admin@MikroTik] > /interface wireless print
Flags: X - disabled, R - running
 0 X  name="wlan1" mtu=1500 l2mtu=1600 mac-address=CC:2D:E0:E1:3E:B9 arp=enabled interface-type=Atheros AR9300 mode=station-pseudobridge
      ssid="MyCoolWifiName" frequency=auto band=2ghz-b/g/n channel-width=20/40mhz-Ce secondary-channel="" scan-list=default
      wireless-protocol=802.11 vlan-mode=no-tag vlan-id=1 wds-mode=disabled wds-default-bridge=none wds-ignore-ssid=no bridge-mode=enabled
      default-authentication=yes default-forwarding=yes default-ap-tx-limit=0 default-client-tx-limit=0 hide-ssid=no
      security-profile=default compression=no

 1  R name="wlan2" mtu=1500 l2mtu=1600 mac-address=CC:2D:E0:E1:3E:B8 arp=enabled interface-type=Atheros AR9888 mode=station-pseudobridge
      ssid="MyCoolWifiName" frequency=auto band=5ghz-a/n/ac channel-width=20/40/80mhz-Ceee secondary-channel="" scan-list=default
      wireless-protocol=802.11 vlan-mode=no-tag vlan-id=1 wds-mode=disabled wds-default-bridge=none wds-ignore-ssid=no bridge-mode=enabled
      default-authentication=yes default-forwarding=yes default-ap-tx-limit=0 default-client-tx-limit=0 hide-ssid=no
      security-profile=default compression=no
§1) Take the WiFi offline
First, I recommend taking the WiFi offline until you’re happy with the configuration.
/interface wireless disable numbers=0,1
§2) Configure the SSID and put the Routerboard into a wireless client mode
Then make sure to set the ssid to your existing WiFi’s ESSID and
mode to station-pseudobridge.
/interface wireless set numbers=0,1 mode=station-pseudobridge ssid="MyCoolWifiName"
§3) Configure the security-profile
Chances are your wireless device already has a security profile, so make
note of the security-profile in the /interface wireless print
output. It is likely security-profile=default.
Next configure the security-profile, mine looks like this:
[admin@MikroTik] > /interface wireless security-profiles print
Flags: * - default
 0 * name="default" mode=dynamic-keys authentication-types=wpa-psk,wpa2-psk unicast-ciphers=aes-ccm group-ciphers=aes-ccm
     wpa-pre-shared-key="Top secret password here" wpa2-pre-shared-key="Top secret password here" supplicant-identity="MikroTik" eap-methods=passthrough
     tls-mode=no-certificates tls-certificate=none mschapv2-username="" mschapv2-password="" disable-pmkid=no static-algo-0=none
     static-key-0="" static-algo-1=none static-key-1="" static-algo-2=none static-key-2="" static-algo-3=none static-key-3=""
     static-transmit-key=key-0 static-sta-private-algo=none static-sta-private-key="" radius-mac-authentication=no
     radius-mac-accounting=no radius-eap-accounting=no interim-update=0s radius-mac-format=XX:XX:XX:XX:XX:XX radius-mac-mode=as-username
     radius-called-format=mac:ssid radius-mac-caching=disabled group-key-update=5m management-protection=disabled
     management-protection-key=""
In short, run the following command:
:local password "Top secret password here"; \
/interface wireless security-profiles set numbers=0 \
  wpa-pre-shared-key=$password wpa2-pre-shared-key=$password
§4) Re-enable the WiFi and test
I know the Amplifi wireless LAN supports 802.11ac and the closest
mesh-point is sufficiently close, so I’ll only enable the radio
capable of 802.11ac. Looking at the output of /interface wireless print I see only wlan2’s band key contains support for
802.11ac (band=5ghz-a/n/ac). So I’ll only enable that radio.
/interface wireless enable wlan2
In any case once everything is set up, make sure one can ping the internet:
admin@MikroTik] > /ping google.com count=3
  SEQ HOST                                     SIZE TTL TIME  STATUS
    0 172.217.9.46                               56  52 25ms
    1 172.217.9.46                               56  52 24ms
    2 172.217.9.46                               56  52 25ms
    sent=3 received=3 packet-loss=0% min-rtt=24ms avg-rtt=24ms max-rtt=25ms
Some gotchas in case things don’t work:
- Can you ping the router via its shared LAN IP
- What parts of the network can be pinged from what devices?
- Is the WiFi SSID/Password correct?
§Conclusion
Though a casual reader might consider this too many steps to configure a network device, it is only a handful of operations. A Router/Switch device’s web configuration GUI might help streamline this, but that doesn’t mean it is any simpler to configure. Chances are one will have to fill in more boxes and tick more fields in such a scenario, since this is a somewhat weird and awkward network topology.
As usual the Mikrotik Wiki helped me get this project finished in little time. Doubly so thanks to the Mikrotik IRC channel. I rather enjoy working with RouterOS because it feels rather state-less. When I specify a configuration, it is usually idempotent, every line of configuration feels relevant to the use-case, and in general feels rather DWIM (Do what I Mean).
I hope this helps somebody, because this took some mild mental
aerobics to figure out how this works. In particular I knew that WiFi
and Ethernet have different frame formats, and Layer 2 bridging
between the two requires weird hacks that are unique to the vendor’s
software/hardware. In this case using station-pseudobridge, the
Routerboard does Layer 2 bridging for certain traffic, and falls
back on Layer 3 for the rest. I don’t fully understand it, but the
results are satisfactory.
§Edit: About the IRC channel
I’m a big fan of IRC however looking over the logs for
##mikrotik, and my interactions, I was very lucky to never be a
target of abuse. Thankfully all I had to deal with are some low
intensity rudeness, and the repercussions of reminding the channel
maybe it’s a good idea to act like adults (and that people remember
interactions like this). Indeed that is apparently a dangerous
discussion to bring up, I guess rude people don’t like being told
they are being rude. I left that channel, and I think others should
avoid it.
Anyway I looked through my year’s worth of logs, and found these comments about the abuse problem in the channel. I have anonymized the names because even trolls/rude users don’t deserve personal attacks. What isn’t included are actual insults and attacks on other users. Those are far too personal and explicit for my blog.
2019-12-19 16:39:03     PersonA       "##mikrotik You've got questions, we've got toxic mockery."
2019-12-19 16:42:14     PersonB       come for the advice, stay for the abuse

2019-12-20 09:20:23     PersonC PersonB: it worked, tyvm
2019-12-20 09:20:24     <--     PersonC (~PersonC@unaffiliated/PersonC) has quit
2019-12-20 09:20:45     PersonD        wat
2019-12-20 09:21:16     PersonB       left without giving me a chance to insult him
2019-12-20 09:21:21     PersonD        damn :(
2019-12-20 09:21:55     PersonD        #mikrotik: Come for the help, stay for the abuse
2019-12-20 09:22:13     PersonB       i did that one already
2019-12-20 09:22:22     PersonB       [22:42:14] <PersonB> come for the advice, stay for the abuse

2019-12-28 15:21:22     PersonE       have you come for the abuse?
2019-12-28 15:30:43     PersonF        always
2019-12-28 16:03:58     PersonB       the abuse is the only way he can come

2020-01-10 16:21:21     PersonG  well you guys led the conversation in that direction
2020-01-10 16:21:27     PersonG  start calling names
2020-01-10 16:21:32     PersonG  I don't work networking
2020-01-10 16:21:41     PersonG  I am messing at home
...
2020-01-10 16:23:24     PersonG  nah, it is excuse to be rude and without any manners.
Indeed they seem to know how inappropriately they service the community the channel is for. As always you can write me about this at the following email: hello AT winny DOT tech. I recommend seeking out another communication medium for questions related to Mikrotik.